Click HERE to return to the contents page
IV. PURCHASING – A/P
[Time: 82:19 min.] [Time: 41:05 min.]Normally you use Purchase Orders in the
procurement process.
However, sometimes, you need items right away.
You submit your order by phone and the vendor the delivers the items
immediately.
For the expedited process you do not use the full purchasing process, instead you use just one purchasing document to keep the process as simple and quick as possible.
Purchasing Items: Proces Overview
Purchasing is not just about ordering and paying for pencils and paper clips. Rather, purchasing is the process of ensuring that a steady stream of required materials is on the way to your company when and where you need them.
Purchase Order > Good Receipt PO > A/P Invoice > Outgoing Payment.
As a fully integrated, end-to-end business management application, SAP Business One helps you run the Purchasing Process, starting with the Purchase Order and continuing with the rest of the purchasing documents.
SAP Business One automatically captures information at each step so you always know what is on hand in inventory as well as the up-to-the-minute financial state of your business.
The real-time view helps you indentify potential shortages before they happen. Precise historical information keeps track of which vendors come through for you consistently.
The graphic shows the basic four-part process of ordering, receiving, and paying for goods services.
The Purchase Order (PO) is the document you provide to the vendor specifying the items or services you want to purchase, including agreed-to quantities and prices. It represents your commitment to the vendor to purchase the items.
The Goods Receipt PO is the document that denotes the delivery of goods from a vendor to a company. It is used to update the inventory quantities and values.
The A/P Invoice (or A/P Voucher) is the document into which accounts payable enters the Vendor's Invoice information and sets up the payment.
The Outgoing Payment is the document which initiates a payment to the vendor account.
There are, generally speaking, four ways of sending outgoing payments: cash, checks, credit cards, and bank transfers.
The are also some additional country-specific Payment Methods.
In SAP Business One, the functionality are reporting associated with processing payments are accessed through the banking module.
A Purchase Order is a commercial document issued by a buyer to a seller specifying the items or services that seller will provide the buyer. The Purchase Order includes the agreed-to quantities and price for the products listed.
How is the information stored in the Purchase Order used?
Normally, when goods are received, Purchase Orders are matched with packing slips and Vendor Invoices before the invoices are paid. In SAP Business One, this process is automated: the Purchase Order can be linked to the Goods Receipt PO (witch shows information from the packing slip), witch then can be linked to the A/P Invoice (which contains the information from the Vendor's Invoice). This automation allows information to be consistent and retained throughout the process. You never have to enter data twice.
When a Purchase Order is added in system, no value-based accounting changes occur. However, the order quantities are listed in inventory management. You can view items and quantities on order in various reports and windows, such as the inventory status report and the Item Master Data window. Obviously, having such real-time access to this information can play a key role in optimizing a company's purchasing and inventory management business processes.
So let us consider a business example for our purchasing
process:
We have 10 printers are currently in stock.
We create a Purchase Order
to buy 5 more from our vendor. After the Purchase Order is saved, a quantity of
five appear on the inventory reports ordered.
Since we have 10 printers in stock
and 5 on order, 15 will be available to promise to our customers, although only
10 are physically in stock.
Key Master Data in Purchasing: Vendor
Now let us look at key Master Data information needed for the Purchase Order. The first required piece of Master Data is the vendor. Vendor data identifies who is supplying the goods and services. You use vendor master records in purchasing to handle all purchasing transactions.
Accounting manages the relevant transactions in one or more control accounts.
Before purchasing documents can be created, the vendor must be entered in the system list of Business Partners.
If you plan to issue the vendor a check or bank transfer using the payment wizard, make sure you have defined the Payment Method in the vendor Business Partner Master record. You can search for the appropriate vendor in any purchasing document. If you are authorized, you can also enter new vendor information while creating a purchasing document.
Key Master Data in Purchasing: Items
Item master fields useful in Purchasing:
- Preferred Vendor
- Manufacturer Catalog Number
- Purchasing Unit of Measure
- Customs group for imported items
- Tax information
Item Master Data identifies what is being purchased. Frequently the same items are purchased, inventoried, and sold. The information is the same; it is just used differently. This is the advantage of using an item master record which can be copied into any document in the purchasing, sales, production, MRP, inventory, and service modules.
The header of Item Master Data Record contains general information about the item, including a unique ID number assigned by the user, a description (including as description in a foreign language) and settings to determine the type of the item, the group it belongs to, the price in the selected Price List.
Checkboxes on the right indicate whether the item is kept in inventory and whether it is offered for sale or purchase (in many cases both apply). The item can be marked as a fixed asset with another checkbox.
The General tab of the Master Data window holds information about the manufacturer of the item, additional identifiers, shipping methods, and issue method.
The Purchasing Data tab indicates the main vendor who sells the item, how to identify the item in a catalog, the units of measurement used for the item for purchasing purposes, and the actual size of the item. For items a purchasing history, you can click on the chart icon on the lower left of the tab to display graphical purchase analysis.
Addresses in the Purchase Order
Two important addresses are entered in the Purchase Order:
- The Ship-to address indicates the address where you would like the vendor to
ship you purchased items. This can default in from two places, depending your
settings.
- The Pay-to address.
For item-type purchasing documents, you can set the system to either default in the company address or the address of the warehouse in the first row of the document.
To set the default to be the warehouse address, you need to
flag the checkbox "Use Warehouse Address" in
Administration > System Initialization > Document Settings:
Use Warehouse Address
If the box is not flagged, the default
address will be the company address.
For service rows, no warehouse is selected. Therefore, the company Ship-to address will always default into service-type purchasing documents.
The Pay-to address is displayed under the Logistics tab and defaults from the vendor Business Partener Master Data record. Always make sure the pay-to address is the correct one for a given purchase since this information prints on the check when payment is issued.
Of course, both addresses can be overwritten inside a purchasing document as needed.
I have spoken with one of my regular vendors about purchasing some items. The vendor have given me information on availability, price and Delivery dates. They have also requested that I send them a Purchase Order to confirm my commitment to order the items.
Purchasing A/P > Purchase Order
Vendor Code is a required field in a Purchase Order. When I enter the code, the system pulls information from the Vendor's Master Data record automatically for my Purchase Order. IN Accounting tab, The Payment Term appear as Net 30 on the Accounting tab. This has defaulted from the vendor master record.
The system determined the appropriate Price List for this vendor. I can change the price based on what the vendor is currently quoting me.
I return to the Contents tab to enter items.
I enter the item code for a printer I wish to order with a quantity of 5. I would like to order laptop cases from this vendor, however since I have never ordered this product in the past. I do not have a master record for this item yet. Fortunately, I have the option of creating an item master from within a marketing document.
I choose the Tab key in the Item No field to create a new item directly from the Purchase Order. Then I choose New to create a new Item master for the laptop cases.
In the item master, I switch to the Purchasing tab to enter Lasercom as the preferred vendor for this item.
As a general rule, our company prefers to have in stock a quantity of 5, in case an unexpected order comes in from a customer.
On the Inventory Data tab, I enter the quantity of 5, in the Required field.
For check Manage Inventory by Warehouse, appear: Min. Inventory, Max. Inventory, Req. Inv. Level
Once I set a required quantity, the system will suggest a quantity to keep the inventory at the required level in Purchase Orders. You can enter the required quantity at the item or the warehouse level. If no quantity is entered, the system assigns the required quantity as 0.
I save the Item master and return to the Purchase Order.
Notice that the suggested quantity of 5 appears for the item based on the quantity in the Required field.
The vendor has told me the price will be 20 for each laptop case as long as I order a quantity of 5, so I enter manually in the Purchase Order.
Before I save the Purchase Order, I want to adjust the delivery dates to match those promised by vendor.
Since this field is currently not visible, I choose Form Settings from the Menu bar. On the Table Format tab, select visible and Active for the fields Del. Date. Then I adjust delivery dates for the items based on what my vendor has promised. The vendor has told me that first two items will be delivered tomorrow but the third item will come a day later.
On the Logistic tab, we can see the ship-to address that has defaulted into the Purchase Order. This is the address where I would like to vendor to ship the items in the Purchase Order.
Because we have flagged the "Use Warehouse checkbox" in the document settings, this ship-ti address has default in from the address of the warehouse used for the first row in the Purchase Order.
The other important address on this tab is the Pay-to Address. This address was drawn from the vendor's Business Partner Master Record. This address will be used for payment information so it is important to be sure it is correct. I could overwrite either address as needed. The changes I make in the Purchase Order will be copied to the Goods Receipt PO and from there to the A/P Invoice. However, they will not update any Master Data. If some reason, the address is incorrect for either the warehouse or the vendor, the Master Data should itself be changed.
You create a Goods Receipt PO when you receive goods from a vendor. In most companies, the person in the warehouse or the office responsabile for taking Delivery of shipments executes the Goods Receipt PO.
For services, the person for whom the services are rendered usually issues the document.
A Goods Receipt PO can be created directly by selecting the document name in the module menu, or it can be built from an existing Purchase Order. If you are basing your Goods Receipt PO on an existing PO, from one or more existing Purchase Orders. Even if you copy all data from an existing PO, you can still adjust quantities an prices - as well as dates, vendor, and item information - before you post (add) the document.
Regardless of how you create your Goods Receipt PO, there should be no differences between the data in the Goods Receipt PO and the vendor's shipping document (packing slip) sent with the items, because the details in the vendor's document are legally binding.
If there are any discrepancies between the base PO data and the vendor's shipping document, you should resolve them the vendor before you post you Goods Receipt PO. It is essential that the quantities and prices in your Goods Receipt PO match the vendor's shipping document.
Unlike a Purchase Order, a Goods Receipt PO cannot be amended after it has been added to system because it triggers both inventory and (when using Perpetual Inventory) accounting transactions.
Now let us look at the effect of the Goods Receipt PO in a business case:
10 printers are
currently in stock
We ordered 5 more from our vendor
The vendor delivers 5
After Goods Receipt PO, 15 are in stock
When our Purchase Order was created, 5 showed as ordered. Now the ordered quantity has returned 0.
Purchasing documents build on each other.
Often, a Purchase Order becomes a Goods Receipt PO that records the vendor's Delivery and finally an A/P Invoice when the vendor's bill is received.
You can quickly copy a document to the next document in the sequence using the Copy To button.
Copy to
- Open saved document to copy
- All items copied to new document
- No options available on how items are copied
- However, you can delete items and adjust quantities after copying
Copy from
- Enter Business Partner in a new document
- Choose one or multiple documents from a list
- Draw document wizard allows you to:
- customize rows copied
- select the exchange rate
The original document is called a base document, the document you create from it is called a target document. Building one document from other saves time and effort. It also reduces the possibility of errors.
When you use the Copy to function, all items are copied to the new document. No options are available on how items are copied.
However you can delete items and adjust quantities after copying.
When you save a target document that contains all of a base documents items and quantities, the base document will be closed and you will not to able to copy it again to another document.
The other method for copying a document is Copy from.
The Copy From button allows you to select a base document or documents from which to create a new document.
Click Copy From starts the draw document wizard. To use the Copy from function, you open a new document and enter a Business Partner. After choosing the Copy from button, you can choose one or multiple documents from a list.
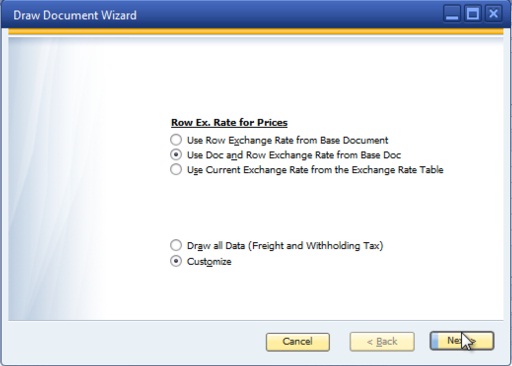
The Draw document wizard allows you to customize the rows and quantities copied into the target document, as well as select which exchange rate to use.
Often the first step in building one document from another is locating the base document you want to use. For example, goods may be Delivered to a warehouse and a Goods Receipt PO needs to be entered.
How do you find the relevant Purchase Order?
One tool for locating such documents quickly is the Open Items List. The report shows all open sales or Purchasing Document of the type you select. You can then choose the relevant Purchase Order, for example, and create a Goods Receipt PO with a single click on the Copy To button.
When one document is built from other is this fashion, all the relevant information is copied from the base document to the new document, reducing both data entry time and errors.
The first Delivery for my Purchase Order has arrived.
However it is not quite what the vendor promised would be delivered today. The laptop case has been delivered early, but did not get the full quantity for one of the other items.
I will enter a Goods Receipt PO with references to the Purchase Order document.
Purchasing A/P > Goods Receipt PO.
I enter the vendor to
display all the open Purchase Order documents. Choose Copy from > Purchase
Orders.
The vendor delivered a full quantity for A00001 and TA200 but delivered only a quantity of 1 for the C00010. For this reason, I will copy 3 items to the Goods Receipt PO in the Draw Document Wizard, but I will reduce the quantity for the C00010.
I select the two radio buttons: Use Doc and Row Exchange Rate from Base document and Customize.
I choose all the delivered items using Ctrl + Click to select individual rows. I change the quantity of C00010 to 1.
I double-check the rows and quantities in the Goods Receipt PO to make sure they match the quantities delivered by the vendor.
The system asks me to confirm that I want to add the document. This is because I cannot change a Goods Receipt PO after I add in to system. I would have to use a Returns document to reverse this document.
Effects of the Goods Receipt PO
Once the Goods Receipt PO is added to the system it has
the following consequences:
1) The Purchase Order (base document) cannot be changes.
2) If you are running Perpetual Inventory, the Goods Receipt PO creates a
Journal Entry to increase inventory value.
3) The system updates the stock quantity in inventory and the unit cost gets
updated based on the purchase price used in the document.
4) Items that have been partially or completely delivered appear in light gray
in the Purchase Order document.
When all items are received, the Purchase Order status changes to closed.
You can use the report Inventory Status to analyze the inventory situation for one or more selected items.
You can also see the inventory status in the item master on the Inventory Data tab page.
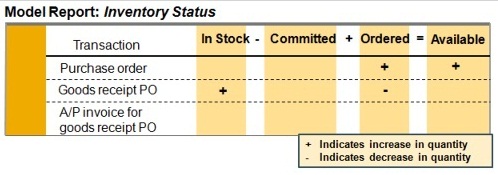
The In Stock column displays the current stock level of the item.
The Committed column displays the item stock that is reserved for customers and for internal use. The stock that is reserved for internal use is the quantity of the item for that will be used for a finished product based on the Bills of Material for existing Production Orders.
The Ordered column displays the quantity Ordered from external vendors plus the quantity that is being produced and that will enter the warehouse by certain date.
Available = In Stock - Committed + Ordered
As you can see in the chart, a Purchase Order increase the quantity on order and therefore the quantity Available to the customer.
When a Goods Receipt PO is created referencing the Purchase Order, it increases the quantity In Stock and reduces the quantity on order.
As long as an A/P Invoice references a Goods Receipt PO, it will not affect stock levels.
Demo - Effects of a Goods Receipt PO
I have just received the second Delivery from my Purchase Order with all the remaining quantity. So I will create a Goods Receipt PO for the remaining items.
Before I do, I would like to take a look at the stock level
for the item C00010. I will use the Inventory Status Report within the Inventory
reports.
Inventory > Inventory Report > Inventory Status.
Purchase A/P > Purchasing Reports > Open Item List
This is a quick way to find my original Purchase Order.
I remember that the order was partially Delivered, but I have forgotten how much was previously delivered.
I can open Row Details to see the Open Quantity on my partially delivered item [Duble click on first column - Item #].
That is a great because the quantity of 4 is exactly what I received. Now I choose Copy to and Goods Receipt PO.
I check the rows and quantities in the Goods Receipt PO to make sure they match the quantities delivered by vendor. The quantity is 4. Everything looks so I will add the second Goods Receipt PO in the system.
Now I will open the document I just created to check the effects of the Good Receipt PO.
I can right click on the row item to open the context menu and then choose Available to Promise. This command opens an inventory status report directly inside the document. I can see the stock quantity in the stock row under the column Ordered. The stock quantity increased by 4 when we added the Goods Receipt PO.
Now I will take a look at Journal Entry to see the effect ofer the Goods Receipt PO on accounting. I choose the Accounting tab. Then I choose the link arrow next to the Journal Remark field. I see two posting that were created automatically because the system is using Perpetual Inventory.
A debit to show the increase in inventory quantity and value and a credit for Goods Receipt, not yet invoiced to accrue the amount owed to the vendor.
[the debit side of the [301] Stock Account and to the credit side of an [408] Allocation Cost Account]
I close all the windows using the menu path: Window > Close All.
An A/P Invoice is entered into system when you a receive an invoice from the vendor. The document will be used to trigger a payment to the vendor. You can create an A/P Invoice new by selecting the document name in the module menu or by basing it on one or more POs or Goods Receipt POs.
If you are basing your A/P Invoice on one or more existing purchasing documents, you may copy all the data contained in the base document or use the draw document wizard to select the data to Copy from one or more existing POs or Goods Receipt POs. Even if you copy all data from existing purchasing document(s, you can still adjust quantities and prices - as well as dates, vendor, and item information - before you post the document.
The posted A/P Invoice generates entries in the General Ledger and updates the vendor account with the amount owed to the vendor.
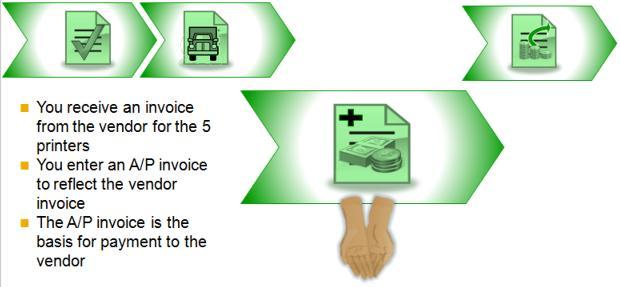
We previously ordered and received 5 printers from our vendor. Now we receive an invoice from the vendor for the 5 printers. We enter an A/P Invoice to reflect the Vendor Invoice. The A/P Invoice in system become the basis for payment to the vendor.

Once the A/P Invoice is created in the system it can have the
following consequences:
1) The Goods Receipt PO increased the stock value earlier. Only if there is no
Goods Receipt PO are the stock values updates when an A/P Invoice is entered.
2) The A/P Invoice creates a Journal Entry to update the vendor's balance to
show the amount due.
3) You cannot change anything in the A/P Invoice that would affect the journal
entry once the invoice is added to the system.
4) On the Goods Receipt PO, items that have already been partially or completely
invoiced display in light gray.
If the invoice is for the full quantity on the Goods Receipt PO, then Goods Receipt PO status changes to Closed.
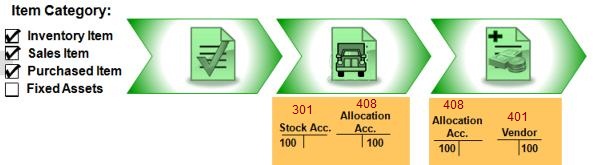
Posting in Purchasing Process for Inventory Items
When you buy inventory items, the system creates the following
Journal Entries:
The Goods Receipt PO creates a Journal Entry that posts the value of the
received goods to the debit side of the [301] Stock
Account and to the credit side of an [408]
Allocation Cost Account. The [301] Stock Account and
the [408] Allocation Cost Account are retrieved from
the Inventory field and the [408] Allocation Account
field on the Inventory data tab on the Item Master Record.
The [408] Allocation Cost Account is a transfer account used to check if Goods Receipt POs and the A/P Invoice match.
The [408] Allocation Account's total balance represents the value of all open Goods Receipt PO that are not yet copied to an A/P Invoice.
When the A/P Invoice is posted, the Goods Receipt PO is closed. At the point, the A/P Invoice creates a Journal Entry that posts the invoiced amount to the debit side of the [408] Allocation Costs Account and the credit side of the [401] Vendor Account. In this way, the amount in the [408] Allocation Cost Account from the Goods Receipt PO is cleared and the system records the amount owed the vendor.
Streamlined Procurement Process
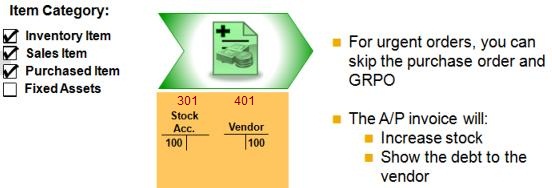
Sometimes, you may need to streamline the purchasing process. Perhaps you need the get an item immediately. So you call the vendor and ask them to delivery the item today. Because of hurry, you skip the Purchase Order. When the items is delivered, the Vendor Invoice is also delivered.
So rather than creating a Goods Receipt PO, you enter an A/P Invoice to process both the receipt of the items into inventory and the obligation to pay the vendor. In this case, when you directly post the A/P Invoice without first creating a Goods Receipt PO, the posting to the [408] Allocation cost Account are omitted.
The posting debits the [301] Stock Account to show the increase inventory and credits the [401] Vendor Account to show the need to pay the vendor.
Because an A/P Invoice that does not reference a Goods Receipt PO will increase inventory, it is important to make sure there is no prior Goods Receipt PO if you create A/P Invoice without reference.
My vendor sent me an invoice for the two deliveries with a invoice.
I enter an A/P Invoice in the system to represent the vendor's request for payment.
Purchasing A/P > A/P Invoice and enter the vendor number.
When I choose Copy from > Goods Receipt PO, I see the Goods Receipt POs with all items. I select both Goods receipt POs. Then I choose Draw all Data in the Draw Document Wizard. I choose Finish. I enter today's date as the posting date.
I enter the number from the Vendor's Invoice into the vendor references number filed.
After your have entered an A/P Invoice, the final step in the Purchasing - A/P process is to trigger the payment to the vendor.
The Outgoing Payment document can be created for the following payment means: cash, check, credit card, bank transfer or bill of exchange.
Once the Outgoing Payment is added, an appropriate Journal Entry is created. The Journal Entry reduces the [401] Vendor's balance. When creating an Outgoing Payment to fully or partially clear a specific document or transaction, an Internal Reconciliation automatically takes place.
Multiple Outgoing Payments can be created together by the Payment Wizard. Payment wizard runs cover A/P and A/R documents and transactions that are not fully paid, credited, or reconciled, as well as unreconciled / allocated payments on account.
When creating Outgoing Payments, either individually or with the Payment wizard, you can also partially pay invoices.
Payment processing is considered to be part of the Banking Module in system.
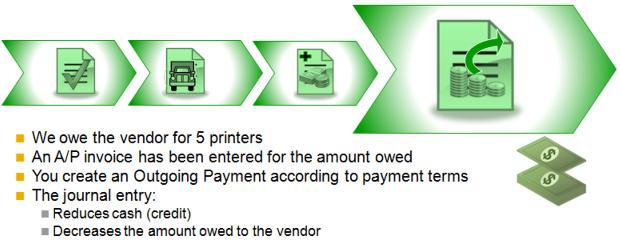
We owe our vendor for the 5 printers that we ordered an received. When we received the Vendor's Invoice, we entered an A/P Invoice for the amount owed.
When the payment is entered, the system triggers the payment to the vendor and creates a Journal Entry to record the payment. The Journal entry reduces cash [5311 / 5121] and decrease the amount that we owe to the vendor [401].
The last step in the purchasing process (paying the Vendor's Invoice) is actually part of the banking module and is typically done by someone in the accounting department.
Banking > Outgoing Payments > Outgoing Payments
I enter the Vendor Code. ... I select the row with the
document number of the invoice. Then I choose the Payment Means icon. ...
For
Total fields I press Ctrl + B
I can bring in the amount by clicking the Amount
column and pressing Ctrl + B.
The system performs an automatic reconciliation of the invoice and payment an closes the A/P Invoice. The vendor's balance is reduces.
Now that we have finished the first three steps in the procurement process for items, we review happens when each document is added.
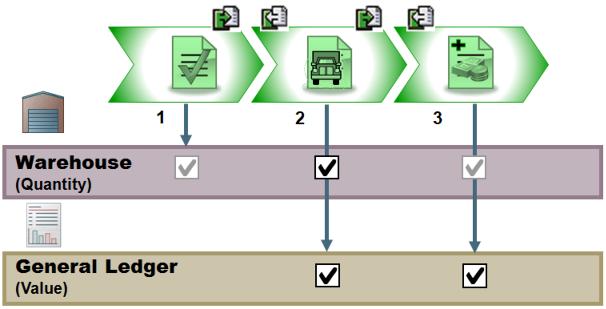
1) Purchase Order: When you enter a Purchase Order, no value-based changes are posted in Accounting.
However, the orders quantities are listed in inventory management. You can view the ordered quantity in various reports and windows such as the inventory status report and the Item Master Data window.
2) Goods Receipt PO: When you enter a Goods Receipt PO, the goods are accepted into the warehouse and the quantities are updated. If you company runs a Perpetual Inventory system, SAP Business One created the relevant postings to update the stock values as well.
3) Accounts Payable Invoice: When an Incoming Invoice posted, the [401] Vendor Account is update in Accounting.
If a Goods Receipt PO is not referenced by the A/P Invoice, the stocks also increase when the Invoice is posted.
[Time: 16:27 min.]First we will explore the basic steps for purchasing services with a Purchase Order.
Then we will look at the steps needed to enter A/P Invoices for services such as rent or utilities.
Sometimes you Purchase services such as web design or landscaping from vendors.
In cases like these, you work with the vendor beforehand to agree on the type of work to be done and the price. In these cases, it makes sense to use a Purchase Order in the purchasing process to confirm you agrement with the vendor.
Instead when the Invoice is received from vendor, you enter the information directly in an A/P Invoice.
Purchase Services - Proces Overview
When you buy landscaping, training or other non-physical purchases, you call still use Purchase Orders and A/P Invoices.
When purchasing services, you may wish to begin with a Purchase Order witch describes the services being purchased, the price agreed to, and the G/L Account associated with the service.
The Purchase Order is optional. The advantage of using a Purchase Order is that it gives you document in witch to set conditions and price for the service. Generally you discuss the scope of the project and expected price with the vendor and at that point the Purchase Order is created with the details of the agreement. When the vendor receives the Purchase Order, they confirm the agreement and dates are set them perform the service.
The Goods Receipt PO document is generally not used for purchasing services. Usually, this step occurs outside the system.
After the service is received and the vendor sends an invoice, an A/P Invoices is entered into system.
Finally, an Outgoing Payment is created to pay the vendor.
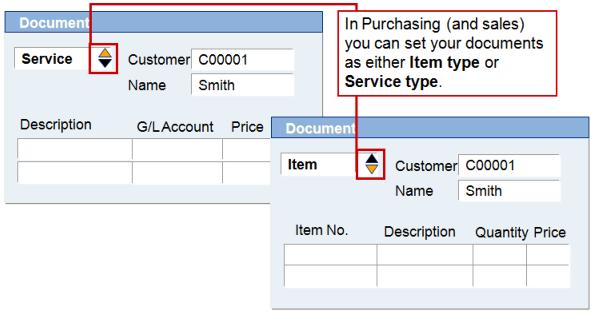
You have two options when purchasing services, you can either set up a service as an item or use a description to purchase the service.
A sales or purchasing document can include either pre-defined items from Master Data or description of services which are directly entered in its rows. The document cannot include both.
When you create a document, you set the Service / Item Type to either Service or Item. This setting applies to entire document, and you cannot change it once you have saved the document.
The table view on the Content tab page is different for each option. When you would you set the Item / Service type to Service?
You only use the Service option in system to buy or sell a service that does not have a master record.
When would you set the Item / Service Type to Item?
When you are purchasing physical and / or services set up as Item Master Data.
I have spoken with a vendor about providing web design services. They are interested but they need a Purchase Order before beginning work.
Purchase A/P > Purchase Order. First I enter Vendor Code for the web design company. I change the Item / Service.
Notice how different fields appear for a service-type document.
I enter a Description for the service and then search for the appropriate [332] G/L Account number for the service. The account is usually an [60*] Expense Account. The vendor has quoted 2000 as the price for service.
Once the services have been provided and I receive an Invoice from the vendor, I will enter an A/P Invoice in the system to approve payment for the vendor.
I choose the vendor from the list of vendors. Then I enter invoice number in the Vendor References Number field.
Before you copy Purchase Order information into A/P Invoice you should always check the Item / Service Type field setting to ensure it matches Item / Service type on the Purchase Order.
Service must display in the Item / Service Type field in order to copy from service Purchase Orders. If Item / Service Type field, you can only Copy from item Purchase Orders.
I enter today as the posting date. I change the document date to match the Vendor's Invoice date. The Vendor's Invoice is dated yesterday.
I copy rows from the Purchase Order I created earlier. I choose Copy from. Then Purchase Orders.
I choose the appropriate Purchase Order from the list by duble-clicking on the row.
Here is a helpful tip: If you do not find the Purchase Order on the list, check that Item / Service Type field is set to Service. I accept the default values in the Draw document Wizard by choosing Finish.
Before I save A/P Invoice I double-check that the total payment due field matches the total on the Vendor Invoice.
For service such as electricity or rent, there is usually no Purchase Order involved in the process.
Let us take a look at the process of creating an A/P Invoice for this type of service.
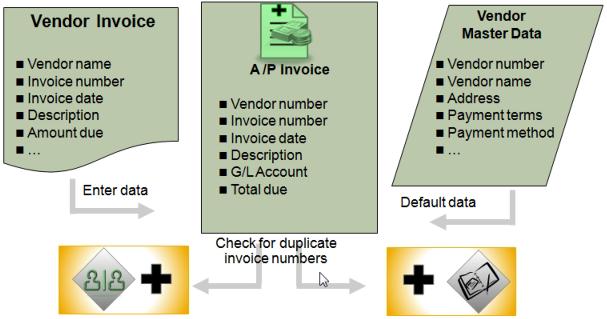
Imagine that you just received a Vendor Invoice for rent from your landlord.
The Vendor Invoice contains the vendor's name, their own invoice number, the date the invoice was issued, a description of the service purchased and the amount due.
... default data from the vendor master record such as the vendor name, address, Payment Terms, Payment Method and more. You enter the Vendor Invoice number and the Vendor Invoice date that you read on the Vendor Invoice.
You verify that the correct Item / Service type settings exists to enter service information such as description of the service and the appropriate G/L Account.
And of course, you enter the amount due in the total due field in the A/P Invoice.
When you save the invoice, SAP Business One performs a duplicate invoice number check for the vendor. The system alerts you if the Vendor Invoice number is found so you can research the invoice. This function helps us to avoid duplicate payments.
When the system saves the invoice, the value updates the amount due to the vendor, the related [60*] Expense Account, and the related general ledger control account at the same time.
I receive a utility bill from a new energy vendor for our main office. I create a non-PO invoice for the utilities.
I create the vendor from the Vendor Code field. Then I enter the Vendor Code and Name. I go to the Addresses tab to enter a Pay-to Address for the vendor.
The utility bill does not have a Vendor Invoice number.
Therefore, for the vendor reference number, I create an abbreviation that will identify invoice from ones I will receive in the future from the same vendor. For my abbreviation I will use a combination of month, year and location where the electricity was provided.
I enter information about the service provided in the A/P Invoice. Then I choose an appropriate G/L Account from the list of accounts.
Lastly, I enter the total amount from the invoice.
Item Category: Purchase Item checked
Beside creating a service-type Purchase Order, you also have the option to use a service item that you created.
This is very useful for service you regularly purchase. If you purchase a service frequently and the price is pre-set with the vendor, an item can be very useful because it allows you track the quantities. This helps standardize reporting fro services.
You can use the usual sales and purchasing analyses for services. Having Item Master Data for your service also reduces the chance for errors during data entry.
You can set up prices, sales quantities, and so on, that default into your documents.
And another nice advantage is that you can add the service item onto item-type purchasing document.
This allows you to combine items and services on the same document.
When you create a service item, you will set the item category as a non-inventory item. For service items, you mark the checkbox for purchased items.
Service items can also be used in sales as well as in purchasing.
In fact, typically creating a service item is done more frequently for selling services, than for purchasing services.
We schedule regular landscaping services for our main office.
Since this work is done frequently and at a set price, we set up an item master for the service.
I find the service item for Landscaping.
Notice the item categories for the item. This is not an inventory item. Price List is a Base Price, Unit Price: 50
This is only a Purchased item. It has a description: Landscape service.
I choose the Purchasing tab to view procurement related information. On this service we see a preferred vendor - our landscape vendor. I can clic on the icon for viewing the purchasing analysis reports. I can see graphs showing purchasing information: quantities purchased on the left and the right I can se a monthly view of purchases. This is possible because we set up the service as an item. I can also see a list of purchasing documents.
If I click on the navigation arrow next to the A/P Invoice number, I can see the actual A/P Invoice. This is the last monthly bill showing me 5 visits for the month.
Notice that the Item/Service type is set as Item. This is a necessary for entering services with Item Master Record.
[Time: 24:47 min.]Describe the options available for handling issue that arise in the purchasing process
In this session, we will explore how to handle issues that arise in the purchasing process.
Purchase Order > Goods Receipt PO > A/P Invoice > Outgoing payment
● Too little quantity
● Too large a quantity
● Substituted Items
● Poor quantity or damaged goods
Sometimes vendors deliver too little or too great a quantity for an item.
A vendor might send a different item than was originally ordered.
In these circumstances you can adjust the Goods Receipt PO accordingly to reflect the actual amount received.
Even when you receive everything exactly as ordered, you can discover that items were damaged in transit.
We will examine the options available in SAP Business One for resolving issue that arise at Goods Receipt.
First, we will see how can handle too little quantity by creating a Goods Receipt for a partial quantity.
Second, we will see how can increase quantity on a Goods Receipt PO when you receive to large a quantity.
Third, we will look at how you can add new items when you receive substitutions.
And finally, we will examine the options for returning poor quantity items or damaged goods.

When a vendor does not delivery a full quantity, you can reference the Purchase Order to create a Goods Receipt PO for a partial quantity. Copy the row from the Purchase Order and reduce the quantity shown. Lather on, when the vendor sends a subsequent shipment, you can reference the Purchase Order second time.
You can reference a Purchase Order as many times as needed, as long as the status is Open. If you do not expect to receive any additional deliveries for a quantity of items not yet received, then you should close the Purchase Order so that the open Purchase Order quantity is reduced. The status of the Purchase Order will change to Closed.
A Purchase Order is automatically closed by the system when all goods are received. If the Purchase Order has been partially received or not received, you can manually close it.
The Purchase Order is not deleted so you can still display or duplicate the document, but is no longer available for copying to another document, such as a Goods Receipt, Goods Return or A/P Invoice.
Another option is to cancel a Purchase Order. This option is generally used when no items on a Purchase Order will ever be received.
You can Cancel a Purchase Order that has never been copied or one that has been partially copied.
As with the status Closed, a Canceled Purchase Order is not deleted. You can still display or duplicate the document, but it cannot be copied to another document.
A canceled Purchase Order does not appear in the Purchase analysis report, whereas a closed one will appear.
You can also choose to close a particular row rather than the entire document.
When I placed this order, the vendor informed me that some of the items may be out of stock, but decided to place the order anyway. Now, the vendor has shipped only a quantity of 3, I will receive the partial quantity.
I choose Copy to: Goods Receipt PO
I change quantity [5] on the first row 3. I add the Goods Receipt PO. This increase my inventory by 3.
The status of Purchase Order remained Open. The status of the Purchase Order changes to Closed when all the items are received. Since this Purchase Order is not fully received, the status remain Open.
I can see the items on the open items list.
Purchasing A/P > Purchasing Reports > Open Items List.
Later on, the vendor sends the remaining quantity of two. I reopen the Purchase Order to create a second Goods Receipt PO to receive the shipment.
Notice that the first item still shows a quantity of 5 which is the original quantity ordered in the Purchase Order. The quantity in the Purchase Order does not change based on the Goods Receipt PO
To view the remaining open quantity, I use Form Settings to display the Open Quantity field.
I Copy the Purchase Order to a Goods Receipt PO by choosing Copy to, then choosing Goods Receipt PO. The item is copied into the Goods Receipt PO with a quantity of 2. The system has subtracted the quantity of 3 that was received in a previous Goods Receipt PO. Since this is the correct quantity, I do not need to change anything. I save the Goods Receipt PO.
I re-open the Purchase Order and I see that the status of the Purchase Order has been set the Closed automatically.
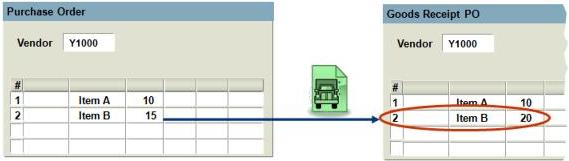
Sometimes vendors delivers too great a quantity for an item.
When you refer to a Purchase Order document while entering a Good Receipt, you can increase the copied quantity to reflect the actual delivered quantity.
We will now look at how to receive a larger quantity than we ordered. I have just received a delivery from my vendor for this Purchase Order. Although O ordered 5 keyboards, the vendor has delivered 6 keyboards. I have spoken with the vendor and agreed to accept the additional keyboard. I will create a Goods Receipt PO to receive the 6 keyboard.
I choose Copy to. Then choose Goods Receipt PO. I change the quantity to 6. Then add the Goods Receipt PO. Then I open my saved Goods Receipt PO, I can navigate back to the original Purchase Order.
Here I can see that the status of the Purchase Order has changed. The Purchase Order has been Closed automatically.
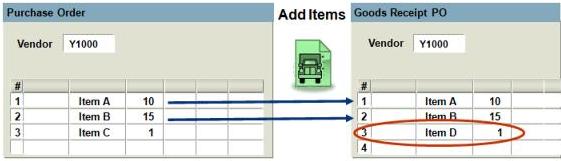
A vendor might send a different item than was originally ordered, perhaps to substitute for an out-of stock item. ... two of three items were delivered by the vendor. Those two items were copied from the Purchase Order to the Goods Receipt PO. However, the third item was not delivered. Instead, the vendor sent a substitute item. When this occurs, you can add the additional item to the Goods Receipt PO.
If the originally ordered item will never be delivered, you should close the original Purchase Order so that this undeliverable item does not continue to appear on purchasing reports as an open item.
We will look at how to receive a substitute delivery. We've just received word from our vendor that they cannot deliver two of the items on the Purchase Order. We will receive the monitors as ordered. However the ink jet cartridges cannot be delivered. Although they cannot send us the regular printers we ordered, they are able to send us a different printer. We agree and they ship the monitors and substitute printers.
Now I will create a Goods Receipt PO for the monitors and printers I have received. I choose Copy to and then choose Goods Receipt PO.
Three items appear to be copied. I delete all the rows except the row with the monitors. Then I add the item code for the printers I did receive: A00003 with a quantity of 3.
Note that if the substitute item were a new item I would need to create a new Item Master Record for the substitute item before I could receive the item into inventory. If a user has the appropriate autorization, the user can create the item master directly from the Goods Receipt PO. I add the Goods Receipt PO.
The status of a Purchase Order changes from Open to Closed when all the items are received.
Since some items on this Purchase Order will never be received, we need to close the Purchase Order manually, so that these items will not continue to appear on purchasing reports as open items.
I go to Data > Close and appear a message: Closing a document is irreversible. Document status will be changed to "Closed". Do you want to continue? The Purchase Order status changes to Closed. We do options to closing individual items.
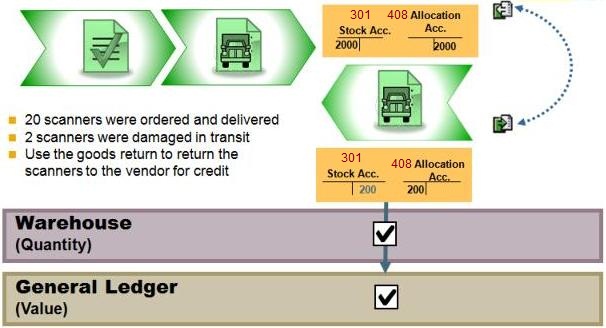
Imagine that we ordered 20 scanners. The vendor delivered all 20 and we received them an a Goods Receipt PO. Then we discovered that 2 were damaged in transit. We can use the Goods Return to document the return of the scanners to the vendor for credit.
We can use a Goods Return document as long as no A/P Invoice exists for the Goods Receipt PO. If you have already entered an A/P Invoice for the transactions, then you must use the A/P Credit Memo function to carry out quantity and value-based corrections in the system.
Think of the Goods Returns as the Clearing document for a Goods Receipt PO.
When you enter a Goods Returns, the goods are issued from the warehouse and the quantities are reduced. If your company runs perpetual inventory, SAP Business One creates the relevant accounting posting to update the stock values as well.
If you Return Goods to a vendor to exchange and later receive a shipment, you can either a Goods Receipt PO without a reference to a Purchase Order in the system or duplicate one of the preceding documents.
Starting 8.81, it is possible to open the Purchase Order when a Return is made. This allows you base the new delivery on the original Purchase Order.
Note that, beginning with release 8.8, when a Goods Return is created without being based on a previous document, the value of Moving Average item is the current item cost calculated for the item and not the unit price entered in the Goods Return document.
We recently received 10 network cards from one of our Vendor. Unfortunately 2 of the cards were faulty so they need to be returned to the vendor.
Since no invoice has been entered for the network cards, I can still create a Goods Returns document referencing the Goods Receipt PO.
Purchasing A/P > Good Return. I enter in the Vendor Code: V10000. Then chose Copy from, Goods Receipt PO. Draw Document Wizard, I choose Customize. I can choose the row and change the quantity to 2. Then I write a note in the remarks field: 2 cards were damaged in transit. Then I save the Goods Return by choosing Add.
Let us view the Journal Entry for the Goods Return. Then choose the Accounting tab, and select the navigation arrow next to the Journal Remark. Here we can see an entry representing the decrease in inventory for the items that were returned. The offset to this entry goes the [408] Goods Receipt Not Invoiced account to reduce the amount that we owe out Vendor.
When the Vendor Invoices us for the items we brought, the amount will include only the 8 network cards.
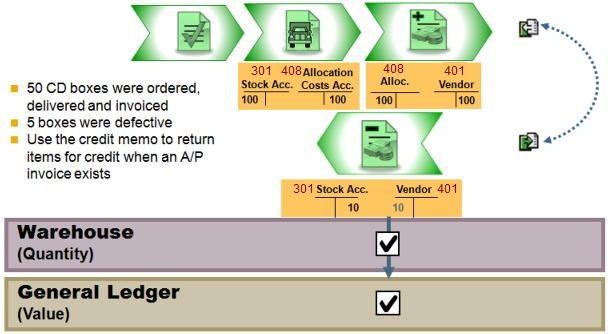
We ordered 50 CD boxers. The vendor delivered the items and the invoice. After we entered the A/P Invoice into system but had not yet paid the vendor, we discovered that 5 boxes were defective. Since the invoice had already been created, we cannot use a Goods Return document. Instead we ask the vendor for a credit.
We create a Credit Memo to document that we have returned the items to vendor for credit. The Credit Memo has the same effect as the Goods Return. The Credit Memo updates the stock quantities and corrects the value in accounting.
Since in this case, we were able to create the Credit Memo by copying the items from the A/P Invoice, the system finds the same accounts that were used to post the invoice and posts a negative value to them.
However, in some cases, it may not be appropriate to copy items to a Credit Memo from an invoice. For example, if the credit was for a price difference rather than for returning items or if the credit referred to an A/P Invoice that we had already paid.
Creating a Credit Memo with or without reference

The method you use to create a Credit memo depends the status of the AQ/P Invoice, Open or Closed, and whether the Credit Memo is related to a specific invoice. When you can identify the related invoice and the invoice is Open, you create a Credit Memo by copying from the original invoice. The credit must be related to a specific, single invoice. The invoice status must be open. You can create a Credit Memo either for the total amount or a partial amount. A Credit Memo for the full invoice quantity will reverse the original invoice. The invoice no longer appear for payment. A Credit Memo for less than original invoice quantity will reduce the total invoice amount due.
If the related invoice is Closed or the credit is related to multiple invoices, then you do not copy from the invoice. Instead you create a Credit Memo without reference to an invoice. As always, you can create a Credit Memo for full amount or partial amount. When you create a Credit Memo without copying from the original invoice, the Credit Memo reduces the total balance due to the vendor.
Starting from release 8.8, the values in the Journal Entry created by an A/P Credit Memo that is not created from Copying from other document are based on the current value calculated for the returned items. This is why it is to copy an invoice whenever possible.
We will enter A/P Credit Memo to process a credit from the vendor for billing to large an amount on a recent invoice.
Vendor V10000 has sent me a Credit Memo for 250 as a credit towards an invoice they sent me earlier this week. Apparently, they entered the price incorrectly so they owe us 250.
I need to enter an A/P Credit Memo to subtract that amount from the A/P Invoice I previously entered.
My first step is to do some research to find out if the invoice has already been paid and Closed.
Purchasing A/P > A/P Invoice. I switch to Find mode. Then I enter the vendor and vendor reference number to search for the invoice. I choose enter to begin the search.
Unfortunately, I cannot reference the original invoice because the status is Closed. Now I look to see if the invoice has been paid. The payment means icon is active. When I choose the icon, I can see the payment to the vendor in the payment list.
Since this invoice is Closed, I cannot reference it, so I must create an A/P Credit Memo without reference to post the credit from the vendor.
Purchasing > A/P Credit MemoIn this example, I do not wish to return items to the vendor. I only want to document the vendor's credit to us. I switch the Item/Service type to Service. I enter the vendor, the vendor reference number and a description. Then I enter the total 250. In the Remark field, I type: Credit to 00125/04. Then I add Credit Memo.